WHAT’S NEW?
Check out our tips and tricks below! And, if you’d like to hear more and receive our specials direct to your inbox, subscribe now!
A GUIDE FOR PROFESSIONAL PRINTING
When it comes to producing high-quality printed materials, having print-ready artwork is an essential step that can greatly impact the outcome. Print-ready artwork is the meticulously prepared design file that meets all the technical requirements for flawless printing, ensuring your materials look just as stunning on paper as they do on your screen. Whether you’re crafting business cards, brochures, posters, or other print products, following these guidelines for print-ready artwork will help you achieve impressive results.
1. Resolution matters: Images used in your design should have a resolution of at least 300 dots per inch (DPI) to ensure sharpness and clarity. Low-resolution images may appear pixelated or blurry when printed.
2. Choose the right colour mode: For most print projects, use the CMYK colour mode, which stands for Cyan, Magenta,
Yellow, and Key (black). This colour mode is optimized for printing and ensures accurate colour representation.
3. Embed fonts: To prevent font-related issues, embed all fonts in your design file. This ensures that the correct fonts are used during printing, even if the printer doesn’t have those fonts installed.
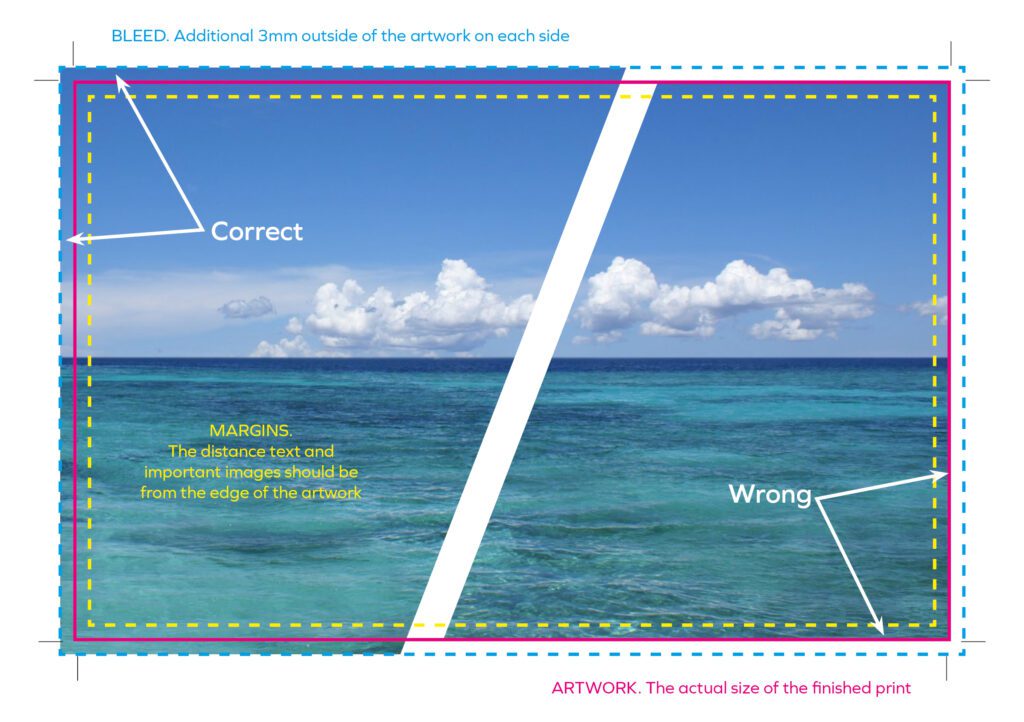
4. Bleed and trim: As covered in our article “Understanding Print Bleed”, extend your design elements 3mm beyond the final trim size to account for any slight cutting variations. This ensures that there are no unwanted white borders.
5. Maintain safe zones: Keep important text, logos, and essential design elements within a safe zone that’s at least 3mm inside the trim area. This precaution prevents crucial content from getting too close to the trim line and potentially being cut off.
6. File formats: Save your artwork in a high/press-quality, widely accepted file format, such as PDF. PDF files retain design integrity and can be easily shared with printers.
7. Check for errors: Thoroughly review your artwork for typos, design inconsistencies, and visual discrepancies. One last check can save you from costly reprints.
8. Save a copy: Always keep a backup copy of your print-ready artwork in its original format. This ensures that you can make future edits or adjustments if needed.
Creating print-ready artwork demands attention to detail and adherence to technical guidelines. By following these steps, you’ll not only streamline the printing process but also achieve professional and visually appealing printed materials that reflect your brand’s quality and professionalism.
ENHANCING PRINT QUALITY AND PROFESSIONALISM
Print bleed is a critical concept in the realm of printing that plays a vital role in achieving high-quality, professional-looking printed materials. Whether you’re designing business cards, flyers, or brochures, understanding and implementing print bleed is essential for producing visually appealing and polished results.
Print bleed refers to the intentional extension of images, graphics, or background colours beyond the final trim size of a printed piece. This technique ensures that even the slightest misalignment or shifting that can occur during the printing and trimming process doesn’t leave white edges or unwanted borders on the final product. Instead, the design elements seamlessly extend to the very edge of the paper, creating a visually pleasing and consistent appearance.
The bleed area typically extends 3mm beyond the final trim size. This allows for a margin of error during printing and cutting, as well as accommodating the variations that might occur due to paper movement or mechanical limitations of the printing equipment.
HOW IT WORKS
Designing with bleed: When creating your artwork, you extend images, colours, and other design elements beyond the trim line by the specified bleed distance (usually 3mm). This ensures that any small discrepancies during printing won’t result in unwanted white borders.
Printing: The design, along with the extended bleed area, is printed on a larger sheet of paper than the final trim size. This step allows for some flexibility in the alignment and cutting process.
Trimming: After printing, the sheets are trimmed down to their final size. The extended bleed area, which might contain parts of the design that extend beyond the intended trim, is removed during this step.
BENEFITS
Professional appearance: Bleed creates a polished and refined look for your printed materials, giving them a professional edge.
Prevents white borders: By accounting for potential shifts during printing and trimming, bleed ensures that no unwanted white borders or gaps appear on the final product.
Design freedom: Designers have the flexibility to extend elements to the edge, enabling creative freedom without worrying about precision.
Consistency: Bleed guarantees consistency across multiple copies, ensuring that each piece looks identical.
In conclusion, print bleed is a crucial consideration in the design and printing process. It ensures that your printed materials look professional and visually appealing by eliminating the risk of white borders and maintaining design consistency. Incorporating proper bleed in your designs demonstrates attention to detail and a commitment to high-quality printed output.